How to Install Android Studio on Mac
Android Studio is the official integrated development environment (IDE) for Android app development. Installing Android Studio on your Mac allows you to develop, test, and debug Android applications efficiently. In this step-by-step guide, we will walk you through the process of installing Android Studio on your Mac.
Step 1: Download Android Studio
- Open your preferred web browser and navigate to the official Android Studio download page at https://developer.android.com/studio/.
- Click on the “Download Android Studio” button to start the download.
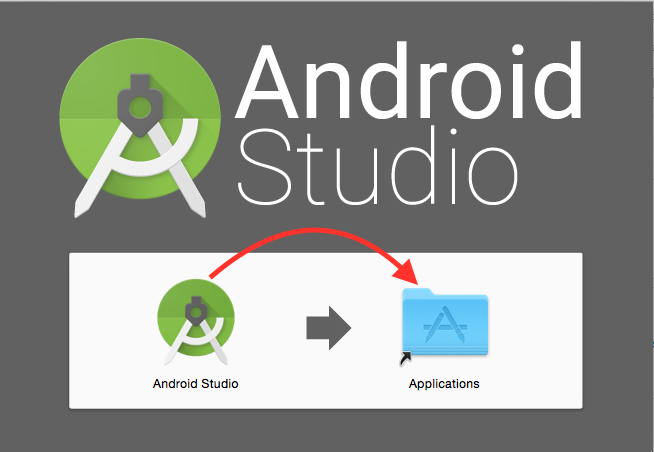
Step 2: Install Android Studio
- Locate the downloaded Android Studio DMG file in your Downloads folder or the specified download location.
- Double-click on the DMG file to open the installation wizard.
- Drag and drop the Android Studio icon into the Applications folder to install the software.
Step 3: Set Up Android Studio
- Open the Applications folder and locate the Android Studio icon.
- Double-click on the Android Studio icon to launch the application.
- On the Welcome to Android Studio window, click on the “Next” button.
- Choose the installation type: Standard or Custom. Select the Standard installation unless you have specific preferences.
- Review the components to be installed and click on the “Next” button.
- Choose the desired UI theme and click “Next.”
- Select the emulator settings as per your preference. If you have a powerful Mac, it is recommended to enable the “Use Host GPU” option for better emulator performance.
- On the “Verify Settings” page, review the configuration summary, and click on the “Finish” button.
Step 4: Download Required Components
- Once the installation is complete, Android Studio will automatically check for and download any required components, such as the Android SDK.
- This process may take some time depending on your internet connection speed.
10 Best Android Studio Alternatives For App Development (2023)
Step 5: Set Up Android Virtual Device (AVD)
- After the required components are downloaded, you will be prompted to set up an Android Virtual Device (AVD) for testing your apps.
- Follow the on-screen instructions to create a new AVD or import an existing one if needed.
- Wait for the AVD to be set up. This may take a few minutes.
Step 6: Launch Android Studio
- Once the setup and initialization process is complete, you will see the Android Studio welcome screen.
- Congratulations! You have successfully installed Android Studio on your Mac.
Step 7: Configure Android Studio
- On the Android Studio welcome screen, you have the option to import settings from a previous installation or customize the settings. Choose the appropriate option based on your preference and click on “OK.”
- Android Studio may prompt you to install additional SDK components or updates. Follow the on-screen instructions to proceed with the installation.
- Next, you will be prompted to sign in with your Google account. Signing in is optional but recommended as it allows you to access additional features and services provided by Google.
Step 8: Configure SDK and SDK Manager
- Once you’re in the Android Studio main window, click on the “Configure” button in the bottom-right corner.
- Select “SDK Manager” from the dropdown menu to open the SDK Manager.
- In the SDK Manager, you can install additional Android SDK versions, tools, and system images for different Android versions. Check the desired packages and click on “Apply” to start the installation.
Step 9: Configure Virtual Device (AVD) Manager
- To create or manage Android Virtual Devices (AVDs), click on the “Configure” button again and select “AVD Manager” from the dropdown menu.
- In the AVD Manager, you can create new AVDs with specific device configurations, such as screen size, Android version, and hardware properties.
- Click on “Create Virtual Device,” select the desired device configuration, and follow the prompts to create the AVD.
Step 10: Update and Maintenance
- Android Studio regularly releases updates to enhance performance, fix bugs, and add new features. It is recommended to keep Android Studio up to date.
- To check for updates, go to the Android Studio menu (on the top-left corner of your screen) and select “Check for Updates.”
- If an update is available, follow the prompts to download and install it.
Installing Android Studio on your Mac is a straightforward process that enables you to develop Android applications effectively. By following the steps outlined in this guide, you can have Android Studio up and running on your Mac in no time. Start exploring the vast capabilities of Android Studio and embark on your Android app development journey. Happy coding!