Unlocking Efficiency: Utilizing Jenkins as a Web-Based Build Management Tool in Java Applications
In modern software development, automation plays a crucial role in ensuring efficient and reliable builds and deployments. Jenkins, a popular open-source web-based build management tool, is widely used to automate the build, test, and deployment processes of software projects. In this blog post, we will explore how to effectively use Jenkins in Java applications to streamline the development workflow, enhance collaboration, and improve overall productivity.
What is Jenkins?
Jenkins is an extensible, web-based automation tool that provides a framework for continuous integration (CI) and continuous delivery (CD). It enables developers to automate various tasks such as building, testing, and deploying applications. With its vast plugin ecosystem and robust integration capabilities, Jenkins can seamlessly fit into Java development environments, making it an ideal choice for managing the build and deployment process.
Step 1: Setting up Jenkins
The first step is to set up Jenkins on your server or local machine. Jenkins can be easily installed by downloading the latest stable version from the official website (https://www.jenkins.io) and following the installation instructions specific to your operating system. Once Jenkins is up and running, access the Jenkins web interface through a browser.
Step 2: Creating a Jenkins Job
A Jenkins job represents a specific task or workflow that you want to automate. To create a Jenkins job for your Java application, click on “New Item” in the Jenkins dashboard. Provide a name for your job and select the appropriate job type (e.g., Freestyle project or Pipeline). Configure the job parameters, such as the version control system, build triggers, and build steps.
Step 3: Configuring Build Steps
In the build steps section, you define the actions that Jenkins will perform during the build process. For Java applications, common build steps include compiling source code, running unit tests, and generating artifacts. Jenkins provides plugins for various build tools like Maven or Gradle, making it easy to integrate your preferred build system into the Jenkins job configuration.
Step 4: Integrating Version Control
To ensure that your Java application’s source code is up to date, integrate a version control system into your Jenkins job. Jenkins supports popular version control systems such as Git, SVN, and Mercurial. Configure the appropriate repository URL, branch, and authentication details to enable Jenkins to fetch the latest code during each build.
Step 5: Setting Up Automated Testing
Quality assurance is a crucial aspect of the software development process. Jenkins allows you to integrate automated testing frameworks such as JUnit or TestNG into your build pipeline. Add test execution steps to your Jenkins job configuration and specify the test reports’ location. Jenkins can generate comprehensive test reports and provide visibility into the test results.
Step 6: Continuous Deployment
With Jenkins, you can automate the deployment of your Java applications to various environments, such as development, staging, and production. Use deployment plugins or custom scripts to define deployment steps in your Jenkins job. These steps may involve packaging the application, deploying it to the target environment, and running any necessary configuration or database migrations.
Step 7: Monitoring and Notifications
Jenkins offers monitoring capabilities to track the build status and performance of your Java applications. Configure email notifications or integrate with communication tools like Slack to receive alerts and updates on build failures or other important events. Monitoring the build status helps you quickly identify and address any issues that may arise during the development process.
Debunking Java 9 Misconceptions: Separating Fact from Fiction
Step 8: Managing Jenkins Plugins
Jenkins has a vast plugin ecosystem that provides additional functionality and integration with various tools and technologies. Explore the Jenkins Plugin Manager to install and manage plugins relevant to your Java application’s specific requirements. Plugins for code analysis, code coverage, static analysis, and deployment targets can enhance the capabilities of your Jenkins setup.
Step 9: Configuring Jenkins Pipelines
Jenkins Pipelines allow you to define your build, test, and deployment workflows as code. With Jenkinsfile, a declarative pipeline syntax or scripted pipeline, you can define complex, multistage pipelines with ease. Pipelines provide more flexibility, traceability, and version control for your build processes, making them a powerful tool for managing Java applications’ lifecycle.
Step 10: Scaling and Distributing Builds
As your Java application grows, the need for scalability in the build process may arise. Jenkins supports distributed builds, allowing you to distribute build workloads across multiple agents or machines. By configuring Jenkins to distribute builds, you can reduce build times and optimize resource utilization, enabling faster feedback loops and improved development efficiency.
Step 11: Implementing Continuous Integration and Delivery (CI/CD)
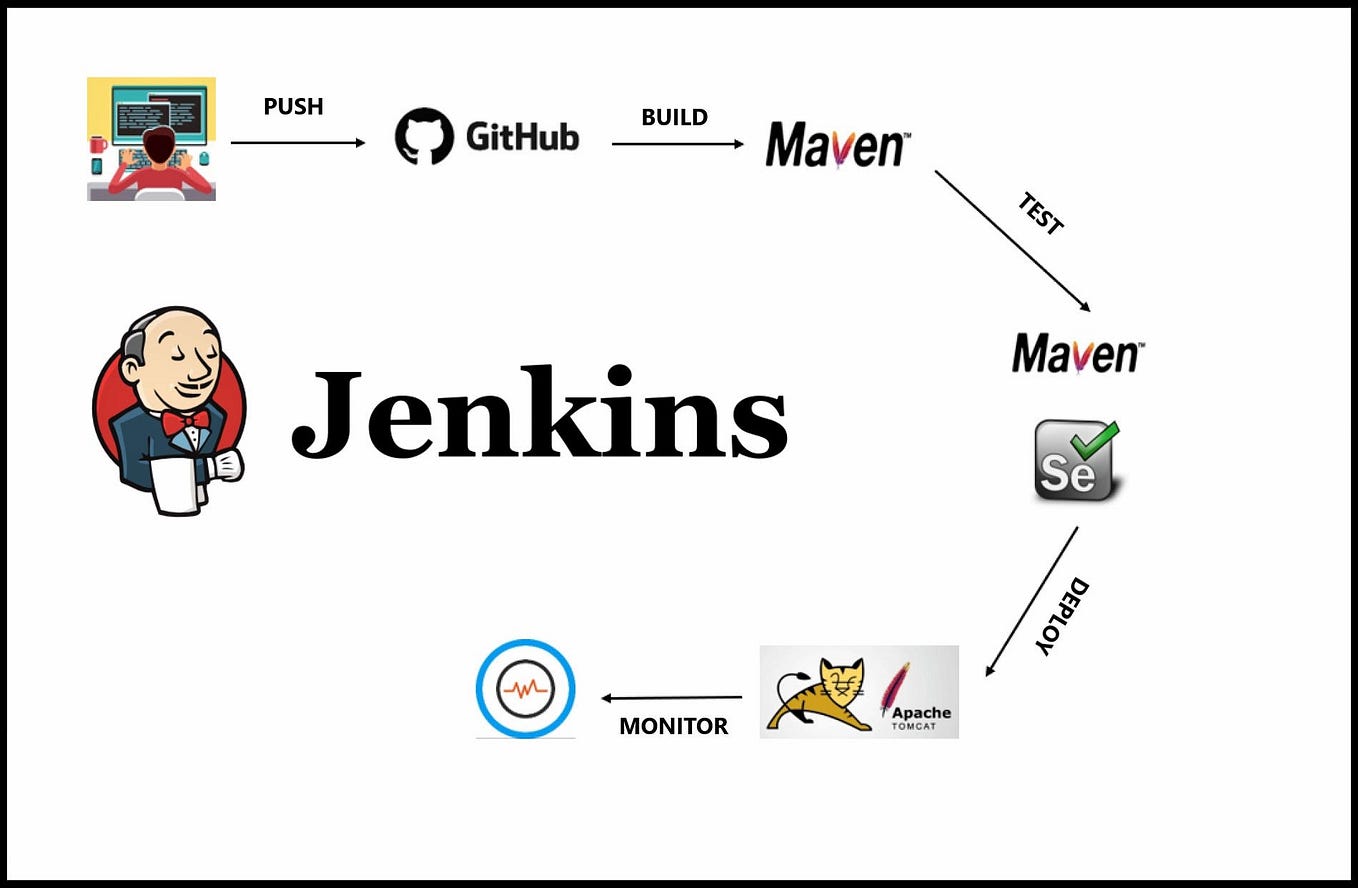
Jenkins excels in enabling CI/CD practices. Continuous Integration involves automatically building and testing your Java application whenever changes are pushed to the version control repository. Jenkins triggers builds based on these changes, ensuring that code integrations are validated quickly and preventing integration issues. Continuous Delivery takes CI a step further by automating the deployment process, enabling the delivery of software to production environments in a reliable and repeatable manner.
Step 12: Monitoring and Analyzing Build Metrics
Jenkins provides insights into build metrics, allowing you to monitor build trends, identify bottlenecks, and optimize the build process. Utilize the Jenkins dashboard to view build history, success rates, and build duration. You can also integrate Jenkins with external monitoring tools and services to gain more in-depth visibility into the performance and health of your Java applications.
Step 13: Backing up and Restoring Jenkins Configuration
Jenkins configuration, including job configurations, plugin settings, and global configurations, should be backed up regularly to avoid any data loss. Implement a backup strategy to protect your Jenkins setup and ensure that you can restore it in case of hardware failures or system crashes. Jenkins provides options for both manual and automated backup processes.
Jenkins provides a powerful and flexible platform for automating build and deployment processes in Java applications. By following the steps outlined in this blog post, you can effectively integrate Jenkins into your Java development workflow, streamline the build process, and enhance collaboration among team members. With Jenkins, you can achieve continuous integration and delivery, resulting in faster development cycles, improved code quality, and efficient application deployments. Start leveraging Jenkins today to unlock the benefits of automation in your Java projects.